


转载请注明出处:http://blog.csdn.net/guolin_blog/article/details/47803149
之前有很多朋友都问过我,在Android系统中怎样才能实现静默安装呢?所谓的静默安装,就是不用弹出系统的安装界面,在不影响用户任何操作的情况下不知不觉地将程序装好。虽说这种方式看上去不打搅用户,但是却存在着一个问题,因为Android系统会在安装界面当中把程序所声明的权限展示给用户看,用户来评估一下这些权限然后决定是否要安装该程序,但如果使用了静默安装的方式,也就没有地方让用户看权限了,相当于用户被动接受了这些权限。在Android官方看来,这显示是一种非常危险的行为,因此静默安装这一行为系统是不会开放给开发者的。
但是总是弹出一个安装对话框确实是一种体验比较差的行为,这一点Google自己也意识到了,因此Android系统对自家的Google Play商店开放了静默安装权限,也就是说所有从Google Play上下载的应用都可以不用弹出安装对话框了。这一点充分说明了拥有权限的重要性,自家的系统想怎么改就怎么改。借鉴Google的做法,很多国内的手机厂商也采用了类似的处理方式,比如说小米手机在小米商店中下载应用也是不需要弹出安装对话框的,因为小米可以在MIUI中对Android系统进行各种定制。因此,如果我们只是做一个普通的应用,其实不太需要考虑静默安装这个功能,因为我们只需要将应用上架到相应的商店当中,就会自动拥有静默安装的功能。
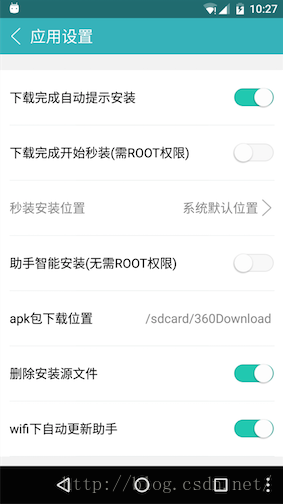
但是如果我们想要做的也是一个类似于商店的平台呢?比如说像360手机助手,它广泛安装于各种各样的手机上,但都是作为一个普通的应用存在的,而没有Google或小米这样的特殊权限,那360手机助手应该怎样做到更好的安装体验呢?为此360手机助手提供了两种方案, 秒装(需ROOT权限)和智能安装,如下图示:
因此,今天我们就模仿一下360手机助手的实现方式,来给大家提供一套静默安装的解决方案。
一、秒装
所谓的秒装其实就是需要ROOT权限的静默安装,其实静默安装的原理很简单,就是调用Android系统的pm install命令就可以了,但关键的问题就在于,pm命令系统是不授予我们权限调用的,因此只能在拥有ROOT权限的手机上去申请权限才行。
下面我们开始动手,新建一个InstallTest项目,然后创建一个SilentInstall类作为静默安装功能的实现类,代码如下所示:
/**
 * 静默安装的实现类,调用install()方法执行具体的静默安装逻辑。
 * 原文地址:http://blog.csdn.net/guolin_blog/article/details/47803149
 * @author guolin
 * @since 2015/12/7
 */
public class SilentInstall {

    /**
     * 执行具体的静默安装逻辑,需要手机ROOT。
     * @param apkPath
     *          要安装的apk文件的路径
     * @return 安装成功返回true,安装失败返回false。
     */
    public boolean install(String apkPath) {
        boolean result = false;
        DataOutputStream dataOutputStream = null;
        BufferedReader errorStream = null;
        try {
            // 申请su权限
            Process process = Runtime.getRuntime().exec("su");
            dataOutputStream = new DataOutputStream(process.getOutputStream());
            // 执行pm install命令
            String command = "pm install -r " + apkPath + "\n";
            dataOutputStream.write(command.getBytes(Charset.forName("utf-8")));
            dataOutputStream.flush();
            dataOutputStream.writeBytes("exit\n");
            dataOutputStream.flush();
            process.waitFor();
            errorStream = new BufferedReader(new InputStreamReader(process.getErrorStream()));
            String msg = "";
            String line;
            // 读取命令的执行结果
            while ((line = errorStream.readLine()) != null) {
                msg += line;
            }
            Log.d("TAG", "install msg is " + msg);
            // 如果执行结果中包含Failure字样就认为是安装失败,否则就认为安装成功
            if (!msg.contains("Failure")) {
                result = true;
            }
        } catch (Exception e) {
            Log.e("TAG", e.getMessage(), e);
        } finally {
            try {
                if (dataOutputStream != null) {
                    dataOutputStream.close();
                }
                if (errorStream != null) {
                    errorStream.close();
                }
            } catch (IOException e) {
                Log.e("TAG", e.getMessage(), e);
            }
        }
        return result;
    }

}
可以看到,SilentInstall类中只有一个install()方法,所有静默安装的逻辑都在这个方法中了,那么我们具体来看一下这个方法。首先在第21行调用了Runtime.getRuntime().exec("su")方法,在这里先申请ROOT权限,不然的话后面的操作都将失败。然后在第24行开始组装静默安装命令,命令的格式就是pm install -r <apk路径>,-r参数表示如果要安装的apk已经存在了就覆盖安装的意思,apk路径是作为方法参数传入的。接下来的几行就是执行上述命令的过程,注意安装这个过程是同步的,因此我们在下面调用了process.waitFor()方法,即安装要多久,我们就要在这里等多久。等待结束之后说明安装过程结束了,接下来我们要去读取安装的结果并进行解析,解析的逻辑也很简单,如果安装结果中包含Failure字样就说明安装失败,反之则说明安装成功。
整个方法还是非常简单易懂的,下面我们就来搭建调用这个方法的环境。修改activity_main.xml中的代码,如下所示:
<?xml version="1.0" encoding="utf-8"?>
<LinearLayout xmlns:android="http://schemas.android.com/apk/res/android"
    xmlns:tools="http://schemas.android.com/tools"
    android:layout_width="match_parent"
    android:layout_height="match_parent"
    android:orientation="vertical"
    android:paddingBottom="@dimen/activity_vertical_margin"
    android:paddingLeft="@dimen/activity_horizontal_margin"
    android:paddingRight="@dimen/activity_horizontal_margin"
    android:paddingTop="@dimen/activity_vertical_margin"
    tools:context="com.example.installtest.MainActivity">

    <LinearLayout
        android:layout_width="match_parent"
        android:layout_height="wrap_content">

        <Button
            android:layout_width="wrap_content"
            android:layout_height="wrap_content"
            android:onClick="onChooseApkFile"
            android:text="选择安装包" />

        <TextView
            android:id="@+id/apkPathText"
            android:layout_width="0dp"
            android:layout_height="wrap_content"
            android:layout_weight="1"
            android:layout_gravity="center_vertical"
            />

    </LinearLayout>


    <View
        android:layout_width="match_parent"
        android:layout_height="1dp"
        android:background="@android:color/darker_gray" />

    <Button
        android:layout_width="wrap_content"
        android:layout_height="wrap_content"
        android:onClick="onSilentInstall"
        android:text="秒装" />

    <View
        android:layout_width="match_parent"
        android:layout_height="1dp"
        android:background="@android:color/darker_gray" />

    <Button
        android:layout_width="wrap_content"
        android:layout_height="wrap_content"
        android:onClick="onForwardToAccessibility"
        android:text="开启智能安装服务" />

    <Button
        android:layout_width="wrap_content"
        android:layout_height="wrap_content"
        android:onClick="onSmartInstall"
        android:text="智能安装" />
</LinearLayout>
这里我们先将程序的主界面确定好,主界面上拥有四个按钮,第一个按钮用于选择apk文件的,第二个按钮用于开始秒装,第三个按钮用于开启智能安装服务,第四个按钮用于开始智能安装,这里我们暂时只能用到前两个按钮。那么调用SilentInstall的install()方法需要传入apk路
径,因此我们需要先把文件选择器的功能实现好,新建activity_file_explorer.xml和list_item.xml作为文件选择器的布局文件,代码分别如下所示:
<?xml version="1.0" encoding="utf-8"?>
<LinearLayout xmlns:android="http://schemas.android.com/apk/res/android"
    android:orientation="vertical"
    android:layout_width="match_parent"
    android:layout_height="match_parent">

    <ListView
        android:id="@+id/list_view"
        android:layout_width="match_parent"
        android:layout_height="match_parent"
         />

</LinearLayout>
<?xml version="1.0" encoding="utf-8"?>
<LinearLayout
xmlns:android="http://schemas.android.com/apk/res/android"
android:layout_width="match_parent"
android:layout_height="wrap_content"
android:padding="4dp"
android:orientation="horizontal">
<ImageView android:id="@+id/img"
android:layout_width="32dp"
android:layout_margin="4dp"
android:layout_gravity="center_vertical"
android:layout_height="32dp"/>
<TextView android:id="@+id/name"
android:textSize="18sp"
android:textStyle="bold"
android:layout_width="match_parent"
android:gravity="center_vertical"
android:layout_height="50dp"/>
</LinearLayout>public class FileExplorerActivity extends AppCompatActivity implements AdapterView.OnItemClickListener {
ListView listView;
SimpleAdapter adapter;
String rootPath = Environment.getExternalStorageDirectory().getPath();
String currentPath = rootPath;
List<Map<String, Object>> list = new ArrayList<>();
@Override
public void onCreate(Bundle savedInstanceState) {
super.onCreate(savedInstanceState);
setContentView(R.layout.activity_file_explorer);
listView = (ListView) findViewById(R.id.list_view);
adapter = new SimpleAdapter(this, list, R.layout.list_item,
new String[]{"name", "img"}, new int[]{R.id.name, R.id.img});
listView.setAdapter(adapter);
listView.setOnItemClickListener(this);
refreshListItems(currentPath);
}
private void refreshListItems(String path) {
setTitle(path);
File[] files = new File(path).listFiles();
list.clear();
if (files != null) {
for (File file : files) {
Map<String, Object> map = new HashMap<>();
if (file.isDirectory()) {
map.put("img", R.drawable.directory);
} else {
map.put("img", R.drawable.file_doc);
}
map.put("name", file.getName());
map.put("currentPath", file.getPath());
list.add(map);
}
}
adapter.notifyDataSetChanged();
}
@Override
public void onItemClick(AdapterView<?> parent, View v, int position, long id) {
currentPath = (String) list.get(position).get("currentPath");
File file = new File(currentPath);
if (file.isDirectory())
refreshListItems(currentPath);
else {
Intent intent = new Intent();
intent.putExtra("apk_path", file.getPath());
setResult(RESULT_OK, intent);
finish();
}
}
@Override
public void onBackPressed() {
if (rootPath.equals(currentPath)) {
super.onBackPressed();
} else {
File file = new File(currentPath);
currentPath = file.getParentFile().getPath();
refreshListItems(currentPath);
}
}
}这部分代码由于和我们本篇文件的主旨没什么关系,主要是为了方便demo展示的,因此我就不进行讲解了。
接下来修改MainActivity中的代码,如下所示:
/**
 * 仿360手机助手秒装和智能安装功能的主Activity。
 * 原文地址:http://blog.csdn.net/guolin_blog/article/details/47803149
 * @author guolin
 * @since 2015/12/7
 */
public class MainActivity extends AppCompatActivity {

    TextView apkPathText;

    String apkPath;

    @Override
    protected void onCreate(Bundle savedInstanceState) {
        super.onCreate(savedInstanceState);
        setContentView(R.layout.activity_main);
        apkPathText = (TextView) findViewById(R.id.apkPathText);
    }

    @Override
    protected void onActivityResult(int requestCode, int resultCode, Intent data) {
        if (requestCode == 0 && resultCode == RESULT_OK) {
            apkPath = data.getStringExtra("apk_path");
            apkPathText.setText(apkPath);
        }
    }

    public void onChooseApkFile(View view) {
        Intent intent = new Intent(this, FileExplorerActivity.class);
        startActivityForResult(intent, 0);
    }

    public void onSilentInstall(View view) {
        if (!isRoot()) {
            Toast.makeText(this, "没有ROOT权限,不能使用秒装", Toast.LENGTH_SHORT).show();
            return;
        }
        if (TextUtils.isEmpty(apkPath)) {
            Toast.makeText(this, "请选择安装包!", Toast.LENGTH_SHORT).show();
            return;
        }
        final Button button = (Button) view;
        button.setText("安装中");
        new Thread(new Runnable() {
            @Override
            public void run() {
                SilentInstall installHelper = new SilentInstall();
                final boolean result = installHelper.install(apkPath);
                runOnUiThread(new Runnable() {
                    @Override
                    public void run() {
                        if (result) {
                            Toast.makeText(MainActivity.this, "安装成功!", Toast.LENGTH_SHORT).show();
                        } else {
                            Toast.makeText(MainActivity.this, "安装失败!", Toast.LENGTH_SHORT).show();
                        }
                        button.setText("秒装");
                    }
                });

            }
        }).start();

    }

    public void onForwardToAccessibility(View view) {

    }

    public void onSmartInstall(View view) {

    }

    /**
     * 判断手机是否拥有Root权限。
     * @return 有root权限返回true,否则返回false。
     */
    public boolean isRoot() {
        boolean bool = false;
        try {
            bool = new File("/system/bin/su").exists() || new File("/system/xbin/su").exists();
        } catch (Exception e) {
            e.printStackTrace();
        }
        return bool;
    }

}
可以看到,在MainActivity中,我们对四个按钮点击事件的回调方法都进行了定义,当点击选择安装包按钮时就会调用onChooseApkFile()方法,当点击秒装按钮时就会调用onSilentInstall()方法。在onChooseApkFile()方法方法中,我们通过Intent打开了FileExplorerActivity,然后在onActivityResult()方法当中读取选择的apk文件路径。在onSilentInstall()方法当中,先判断设备是否ROOT,如果没有ROOT就直接return,然后判断安装包是否已选择,如果没有也直接return。接下来我们开启了一个线程来调用SilentInstall.install()方法,因为安装过程会比较耗时,如果不开线程的话主线程就会被卡住,不管安装成功还是失败,最后都会使用Toast来进行提示。
代码就这么多,最后我们来配置一下AndroidManifest.xml文件:
<?xml version="1.0" encoding="utf-8"?>
<manifest xmlns:android="http://schemas.android.com/apk/res/android"
    package="com.example.installtest">

    <uses-permission android:name="android.permission.READ_EXTERNAL_STORAGE" />

    <application
        android:allowBackup="true"
        android:icon="@mipmap/ic_launcher"
        android:label="@string/app_name"
        android:supportsRtl="true"
        android:theme="@style/AppTheme">
        <activity android:name=".MainActivity">
            <intent-filter>
                <action android:name="android.intent.action.MAIN" />

                <category android:name="android.intent.category.LAUNCHER" />
            </intent-filter>
        </activity>

        <activity android:name=".FileExplorerActivity"/>
    </application>

</manifest>
并没有什么特殊的地方,由于选择apk文件需要读取SD卡,因此在AndroidManifest.xml文件中要记得声明读SD卡权限。
另外还有一点需要注意,在Android 6.0系统中,读写SD卡权限被列为了危险权限,因此如果将程序的targetSdkVersion指定成了23则需要做专门的6.0适配,这里简单起见,我把targetSdkVersion指定成了22,因为6.0的适配工作也不在文章的讲解范围之内。
现在运行程序,就可以来试一试秒装功能了,切记手机一定要ROOT,效果如下图所示:

可以看到,这里我们选择的网易新闻安装包已成功安装到手机上了,并且没有弹出系统的安装界面,由此证明秒装功能已经成功实现了。
二、智能安装
那么对于ROOT过的手机,秒装功能确实可以避免弹出系统安装界面,在不影响用户操作的情况下实现静默安装,但是对于绝大部分没有ROOT的手机,这个功能是不可用的。那么我们应该怎么办呢?为此360手机助手提供了一种折中方案,就是借助Android提供的无障碍服务来实现智能安装。所谓的智能安装其实并不是真正意义上的静默安装,因为它还是要弹出系统安装界面的,只不过可以在安装界面当中释放用户的操作,由智能安装功能来模拟用户点击,安装完成之后自动关闭界面。这个功能是需要用户手动开启的,并且只支持Android 4.1之后的手机,如下图所示:

好的,那么接下来我们就模仿一下360手机助手,来实现类似的智能安装功能。
智能安装功能的实现原理要借助Android提供的无障碍服务,关于无障碍服务的详细讲解可参考官方文档:http://developer.android.com/guide/topics/ui/accessibility/services.html。
首先在res/xml目录下新建一个accessibility_service_config.xml文件,代码如下所示:
<accessibility-service xmlns:android="http://schemas.android.com/apk/res/android"
                       android:packageNames="com.android.packageinstaller"
                       android:description="@string/accessibility_service_description"
                       android:accessibilityEventTypes="typeAllMask"
                       android:accessibilityFlags="flagDefault"
                       android:accessibilityFeedbackType="feedbackGeneric"
                       android:canRetrieveWindowContent="true"
    />
其中,packageNames指定我们要监听哪个应用程序下的窗口活动,这里写com.android.packageinstaller表示监听Android系统的安装界面。description指定在无障碍服务当中显示给用户看的说明信息,上图中360手机助手的一大段内容就是在这里指定的。accessibilityEventTypes指定我们在监听窗口中可以模拟哪些事件,这里写typeAllMask表示所有的事件都能模拟。accessibilityFlags可以指定无障碍服务的一些附加参数,这里我们传默认值flagDefault就行。accessibilityFeedbackType指定无障碍服务的反馈方式,实际上无障碍服务这个功能是Android提供给一些残疾人士使用的,比如说盲人不方便使用手机,就可以借助无障碍服务配合语音反馈来操作手机,而我们其实是不需要反馈的,因此随便传一个值就可以,这里传入feedbackGeneric。最后canRetrieveWindowContent指定是否允许我们的程序读取窗口中的节点和内容,必须写true。
记得在string.xml文件中写一下description中指定的内容,如下所示:
<resources>
    <string name="app_name">InstallTest</string>
    <string name="accessibility_service_description">智能安装服务,无需用户的任何操作就可以自动安装程序。</string>
</resources>
<?xml version="1.0" encoding="utf-8"?>
<manifest xmlns:android="http://schemas.android.com/apk/res/android"
    package="com.example.installtest">

    <uses-permission android:name="android.permission.READ_EXTERNAL_STORAGE" />

    <application
        android:allowBackup="true"
        android:icon="@mipmap/ic_launcher"
        android:label="@string/app_name"
        android:supportsRtl="true"
        android:theme="@style/AppTheme">
        ......

        <service
            android:name=".MyAccessibilityService"
            android:label="我的智能安装"
            android:permission="android.permission.BIND_ACCESSIBILITY_SERVICE">
            <intent-filter>
                <action android:name="android.accessibilityservice.AccessibilityService" />
            </intent-filter>

            <meta-data
                android:name="android.accessibilityservice"
                android:resource="@xml/accessibility_service_config" />
        </service>
    </application>

</manifest>
这部分配置的内容多数是固定的,必须要声明一个android.permission.BIND_ACCESSIBILITY_SERVICE的权限,且必须要有一个值为android.accessibilityservice.AccessibilityService的action,然后我们通过<meta-data>将刚才创建的配置文件指定进去。
接下来就是要去实现智能安装功能的具体逻辑了,创建一个MyAccessibilityService类并继承自AccessibilityService,代码如下所示:
/**
 * 智能安装功能的实现类。
 * 原文地址:http://blog.csdn.net/guolin_blog/article/details/47803149
 * @author guolin
 * @since 2015/12/7
 */
public class MyAccessibilityService extends AccessibilityService {

    Map<Integer, Boolean> handledMap = new HashMap<>();

    public MyAccessibilityService() {
    }

    @Override
    public void onAccessibilityEvent(AccessibilityEvent event) {
        AccessibilityNodeInfo nodeInfo = event.getSource();
        if (nodeInfo != null) {
            int eventType = event.getEventType();
            if (eventType== AccessibilityEvent.TYPE_WINDOW_CONTENT_CHANGED ||
                    eventType == AccessibilityEvent.TYPE_WINDOW_STATE_CHANGED) {
                if (handledMap.get(event.getWindowId()) == null) {
                    boolean handled = iterateNodesAndHandle(nodeInfo);
                    if (handled) {
                        handledMap.put(event.getWindowId(), true);
                    }
                }
            }
        }
    }

    private boolean iterateNodesAndHandle(AccessibilityNodeInfo nodeInfo) {
        if (nodeInfo != null) {
            int childCount = nodeInfo.getChildCount();
            if ("android.widget.Button".equals(nodeInfo.getClassName())) {
                String nodeContent = nodeInfo.getText().toString();
                Log.d("TAG", "content is " + nodeContent);
                if ("安装".equals(nodeContent)
                        || "完成".equals(nodeContent)
                        || "确定".equals(nodeContent)) {
                    nodeInfo.performAction(AccessibilityNodeInfo.ACTION_CLICK);
                    return true;
                }
            } else if ("android.widget.ScrollView".equals(nodeInfo.getClassName())) {
                nodeInfo.performAction(AccessibilityNodeInfo.ACTION_SCROLL_FORWARD);
            }
            for (int i = 0; i < childCount; i++) {
                AccessibilityNodeInfo childNodeInfo = nodeInfo.getChild(i);
                if (iterateNodesAndHandle(childNodeInfo)) {
                    return true;
                }
            }
        }
        return false;
    }

    @Override
    public void onInterrupt() {
    }

}
接下来就是调用iterateNodesAndHandle()方法来去解析当前界面的节点了,这里我们通过递归的方式将安装界面中所有的子节点全部进行遍历,当发现按钮节点的时候就进行判断,按钮上的文字是不是“安装”、“完成”、“确定”这几种类型,如果是的话就模拟一下点击事件,这样也就相当于帮用户自动操作了这些按钮。另外从Android 4.4系统开始,用户需要将应用申请的所有权限看完才可以点击安装,因此如果我们在节点中发现了ScrollView,那就模拟一下滑动事件,将界面滑动到最底部,这样安装按钮就可以点击了。
最后,回到MainActivity中,来增加对智能安装功能的调用,如下所示:
/**
 * 仿360手机助手秒装和智能安装功能的主Activity。
 * 原文地址:http://blog.csdn.net/guolin_blog/article/details/47803149
 * @author guolin
 * @since 2015/12/7
 */
public class MainActivity extends AppCompatActivity {

    ......

    public void onForwardToAccessibility(View view) {
        Intent intent = new Intent(Settings.ACTION_ACCESSIBILITY_SETTINGS);
        startActivity(intent);
    }

    public void onSmartInstall(View view) {
        if (TextUtils.isEmpty(apkPath)) {
            Toast.makeText(this, "请选择安装包!", Toast.LENGTH_SHORT).show();
            return;
        }
        Uri uri = Uri.fromFile(new File(apkPath));
        Intent localIntent = new Intent(Intent.ACTION_VIEW);
        localIntent.setDataAndType(uri, "application/vnd.android.package-archive");
        startActivity(localIntent);
    }

}
当点击了开启智能安装服务按钮时,我们通过Intent跳转到系统的无障碍服务界面,在这里启动智能安装服务。当点击了智能安装按钮时,我们通过Intent跳转到系统的安装界面,之后所有的安装操作都会自动完成了。
现在可以重新运行一下程序,效果如下图所示:

可以看到,当打开网易新闻的安装界面之后,我们不需要进行任何的手动操作,界面的滑动、安装按钮、完成按钮的点击都是自动完成的,最终会自动回到手机原来的界面状态,这就是仿照360手机助手实现的智能安装功能。
好的,本篇文章的所有内容就到这里了,虽说不能说完全实现静默安装,但是我们已经在权限允许的范围内尽可能地去完成了,并且360手机助手也只能实现到这一步而已,那些被产品经理逼着去实现静默安装的程序员们也有理由交差了吧?
关注我的技术公众号,每天都有优质技术文章推送。关注我的娱乐公众号,工作、学习累了的时候放松一下自己。
微信扫一扫下方二维码即可关注:


 5013
5013


 被折叠的 条评论
为什么被折叠?
被折叠的 条评论
为什么被折叠?
 到【灌水乐园】发言


